linux(centos7) 환경에서 Apache와 tomcat 연동하기(3)
1. 멀티 도메인
virtual host (가상 호스트)는 하나의 서버에서 여러 웹사이트를 서비스 한다는 의미.
서버가 1개, ip도 1개 두개의 도메인이 하나의 ip로 설정되어 있고 각각의 도메인으로 접속 했을 때, 서로 다른 화면을 보여주는 것은 virtual host를 통해서 구성할 수 있다. 실습환경은 다음과 같다.
Linux : Centos7
apache : 2.4.46
tomcat : 8.5
먼저 httpd.conf 파일에서 설정에 필요한 모듈의 주석을 풀어준다
# nano 아파치홈/conf/httpd.conf
Virtual Host 부분도 주석을 풀어준다.

설정이 끝났으면 httpd-vhosts.conf 파일에서 virtual host 구성을 해줘야 합니다.
# nano 아파치홈/conf/extra/httpd-vhosts.conf
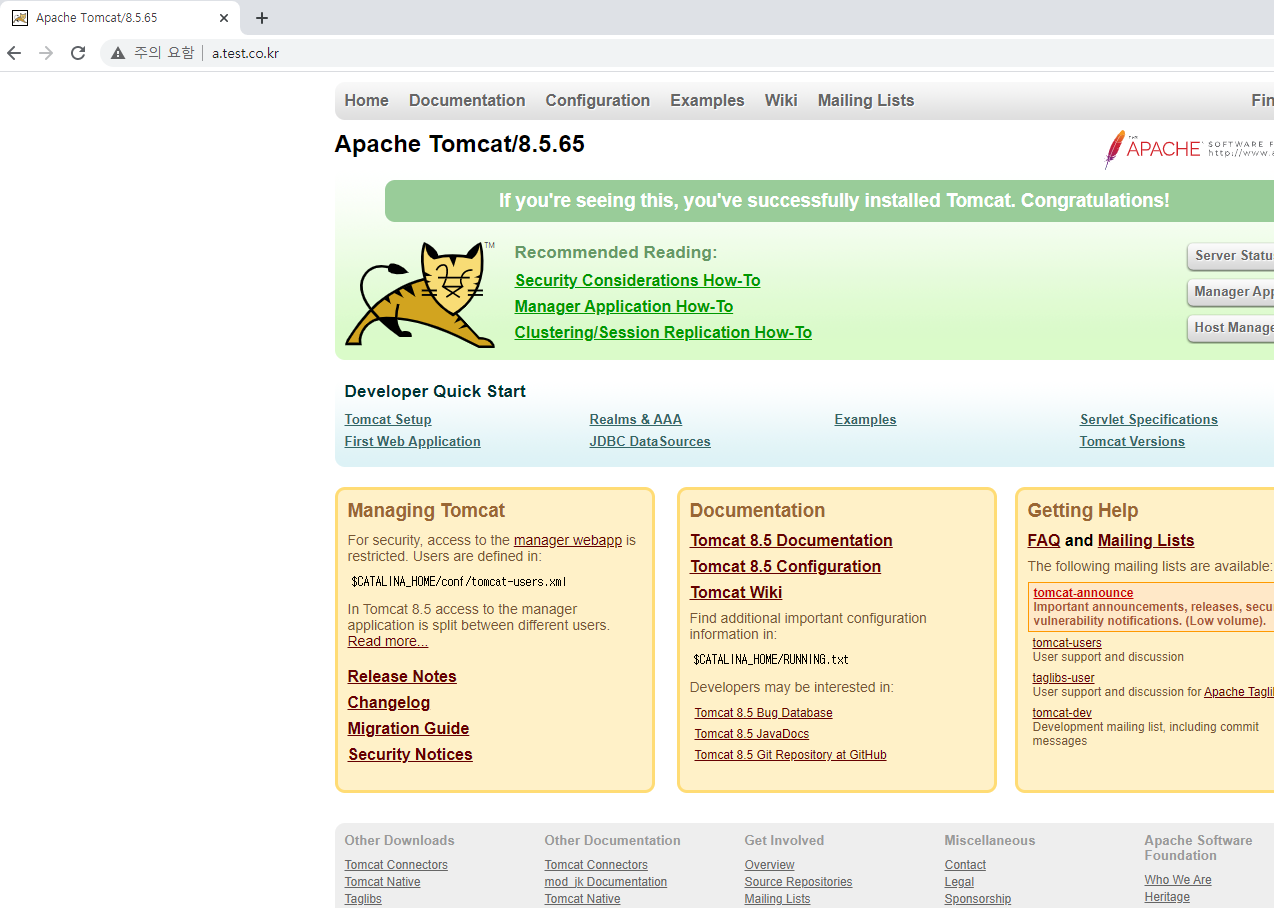
우선, a.test.co.kr 도메인을 입력했을 때 톰캣홈 화면을 보여주는 virtualhost 구문
<VirtualHost *:80>

        DocumentRoot /SW/web/src
        DirectoryIndex index.html
        ServerName a.test.co.kr

        ErrorDocument 403 /error.html
        ErrorDocument 404 /error.html
        ErrorDocument 500 /error.html

        ErrorLog "|/SW/web/httpd-2.4.46/bin/rotatelogs -l /SW/web/httpd-2.4.46/logs/t_error.log.%Y%m%d 86400"
        CustomLog "|/SW/web/httpd-2.4.46/bin/rotatelogs -l /SW/web/httpd-2.4.46/logs/t_access.log.%Y%m%d 86400" combi$

        <Proxy balancer://pc_cluster stickysession=JSESSIONID>
                BalancerMember http://localhost:8080 route=pc01 loadfactor=5 retry=2
        </Proxy>

        ProxyPass /pub !
        ProxyPassReverse /pub !

        ProxyPass / balancer://pc_cluster/
        ProxyPassReverse / balancer://pc_cluster/

        Header unset X-Frame-Options

        <Location />
            Options NONE
            Require all granted
            AddOutputFilterByType DEFLATE text/html text/plain text/xml
        </Location>

</VirtualHost>
b.test.co.kr 도메인을 입력했을 때 index.html 페이지 화면을 보여주는 virtualhost 구문
<VirtualHost *:80>

        DocumentRoot /SW/web/src
        DirectoryIndex index.html
        ServerName b.test.co.kr

        ErrorDocument 403 /error.html
        ErrorDocument 404 /error.html
        ErrorDocument 500 /error.html

        ErrorLog "|/SW/web/httpd-2.4.46/bin/rotatelogs -l /SW/web/httpd-2.4.46/logs/t_error.log.%Y%m%d 86400"
        CustomLog "|/SW/web/httpd-2.4.46/bin/rotatelogs -l /SW/web/httpd-2.4.46/logs/t_access.log.%Y%m%d 86400" combi$

        <Proxy balancer://pc_cluster stickysession=JSESSIONID>
                BalancerMember http://localhost:8080 route=pc01 loadfactor=5 retry=2
        </Proxy>

        ProxyPass /pub !
        ProxyPassReverse /pub !

        ProxyPassMatch ^/(.*\.html)$ !
        ProxyPassReverse / balancer://pc_cluster/

        Header unset X-Frame-Options

        <Location />
            Options NONE
            Require all granted
            AddOutputFilterByType DEFLATE text/html text/plain text/xml
        </Location>

</VirtualHost>
이제는 사용할 Host(도메인)가 내부망에 연결되도록 등록해야 합니다.
C:\Windows\System32\Drivers\etc\hosts 이 위치에 있는 hosts파일을 메모장으로 열어줍니다.(관리자 권한으로 실행)
다음과 같이 아래쪽에 도메인을 등록시켜 줍니다. 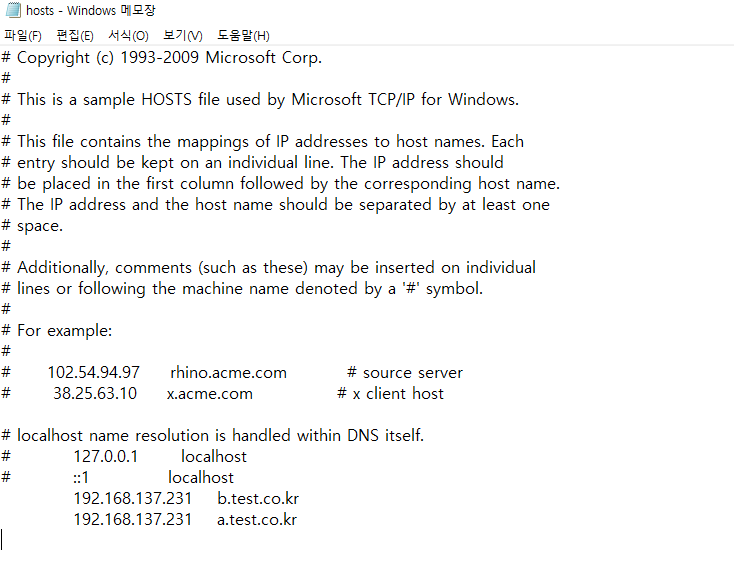
등록이 끝났으면 웹 브라우저에서 확인을 해봅니다.